Showing posts with label Sewing. Show all posts

Thursday, 15 September 2011

The progress so far

I've finally got around to drafting my skirt pattern and have also cut out the skirt pieces... Still need to do the waist band, but that shouldn't take too long!

I was really surprised how large the pattern turned out! If it was any bigger I think I would need a bigger house! lol

For my skirt I have decided to go for a longer length, falling around mid-calf. Hopefully it will be flattering, if not I might shorten it a little... But for now the length is 30inches.

To draft my pattern I had to stick 14 sheets of A3 paper together!! As I was doing this during the day I constructed it on our bed. As you can see from the pictures below, it took up practically the whole bed!

Just starting to draw out the pattern

The finished pattern all cut out
After seeing how large the pattern was I knew there was no way I would be able to carry on till the kids were in bed and I could lay the fabric out in the living room. This is the bit were I almost needed a bigger house. I had to move some furniture out to be able to lay out the fabric and I only just had enough room!

In the bottom right corner you can see the wall were the
fabric started and it stretched to just under the sofa!
I followed the layout suggestion provided by Tanya which you can view here. I also used this link and the equation to calculate the amount of fabric I would require (3 metres). On a side note, I guess I can no longer say that I've not used my maths since leaving school! ;)

One of the main things I've been stressing over since buying my lovely checked/plaid fabric, is matching the pattern at the seams. This is something that I have never done before and to be honest looks pretty complicated! Also if you get it wrong it makes the finished garment look very amateur. Lucky for me, the fabric I have chosen has even checks (i.e. they are symmetrical), if they were uneven I think this process may have been more tricky? In The Complete Book of Sewing, it suggests you mark the fabric bars (stripes) onto the pattern paper with a pencil or crayon.

Doh!


I marked the bars along the edge of the paper for about 30cm before realising it was really the pattern along the straight edge that I needed to match! *face palm*

The seam will be along the straight edge, therefore this is where you need
pattern match!


As I was working on the laying of the pattern pieces and matching the pattern, it occurred to me that I could also match the vertical bars to create a seamless finish. Luckily for me the pattern is perfectly proportioned for this. The thickest bar (the one at the middle of the repeating pattern) is exactly 3cm wide. I am using a 1.5cm seam allowance, so in theory if I cut along the edge of this bar the sewing line will be perfectly in the middle... Theoretically anyway!! :/

To give you an idea of what I am jabbering on about!

Finally all lined up and ready to cut.


I can't tell you how many times I checked (lol) everything before cutting! I get so paranoid I am going to do something wrong and ruin all that beautiful fabric! I still don't know for sure I've done it right. Wont know for definite until I get to the sewing :/

For the second skirt piece I was finding it tricky to get the pattern of the fabric to match up whilst keeping the straight edge of the paper on the edge of the stripe. I think this was due to my paper being not completely square and flat due to the sticky tape. Also the lack of room was creating difficulty, it was hard moving around the fabric without stepping on it and pulling it off grain. In the end I decided to lay the cut fabric on top and use that as my pattern piece. I pinned the pieces together all the way around the permitter, matching the pattern as I went. Doing it this way (I hope) will have worked perfectly. I forgot to take a picture of this, but I hope you get the idea!?

Here's an idea of what the two pieces should look like when sewn together!

How tiny does the waist hole look!!!


Well, that's as far as I have got for now. I think the next step in the sew along is to join the side seams... That will be the moment of truth for the pattern matching! Eeek!

Thanks for reading, hope my ramblings made sense!

xx

Tuesday, 6 September 2011

Circle Skirt Teaser


For as long as I can remember I have had a fondness for 1950's fashion, specifically the circle skirt, or poodle skirts as I called them before I knew any better! I don't know where it came from, but all those times watching Back to the Future, Peggy Sue Got Married and Grease probably had something to do with it! I vividly remember being 11 years old and standing in Florida's Old Town, gazing at the beautiful clothes in a vintage fashion store... *sigh*

Well, a couple of weeks ago, Casey over at Elegant Musings decided the time had come to do a circle skirt sew along. And well, who could pass up an opportunity like that? I for one cannot!


And so I am currently taking part in my very first sew-along! *claps hands excitedly*

Unfortunately Casey has been suffering a few technical issues recently, so its all getting a little delayed. But the other day I got my supplies ordered and am rather excited so I thought I'd share them with you!


I really love the way checked or plaid fabrics look when made into a circle skirt, so I knew this was what I wanted to go for. I also fell in love with an image on Casey's Inspiration post, a plain black skirt with a red lining. And so...


My petticoat is going to be in these vibrant reds. I'm hoping that you'll get a cheeky glimpse of them every now and then when I'm walking, sitting, etc. :D
Well that's all I have to share for now! 

xx

Thursday, 1 September 2011

The Body Block

Ok, just incase anyone stumbles upon this via Google or something, this is a body block of the non-martial art variety!

For those of you that don't know what a (non-martial art) body block is, it is basically a fabric copy of your exact body shape. This can then be used to create pattern pieces for your own clothing designs... It also means that the subsequent designs should fit you like a glove! Well that's the theory anyway!

I have been planning to make one for quite some time now, unfortunately I never seem to get round to it. But last week Danny and I were both off work and for a change didn't have any concrete plans as to how to spend our time... And so out came the muslin, my good friend Shell (get it? My Shell! I am a comedy GENIUS!) and my trusty sewing machine!

By the way, I should probably mention I made this block by following the detailed instructions in The Little Black Dress by Simon Henry. I am still to make my 'Little Black Dress' but can thoroughly recommend this book to beginner sewers and possibly even more experienced ones. It covers all the  techniques needed to stitch your own LBD, information on fabric choices, body shapes, how to manipulate your body body block to make 3 different dresses and a bolero... And also instructions to make a fascinator! I actually own all three of his books, but I think this one is still my favourite!

But anyway, back to the body block! I'm not going to go into all the details as this would be a VEEERY long post, I just wanted to give you an idea of the process. If you want to have a go you could get the book from the library, or I'm sure there are tutorials out in cyberspace somewhere!

Step 1: Get yourself a t-shirt that fits you really well and draw a line down the middle (front and back)

Shell wearing my Inc. t-shirt
I used chalk to mark my line as I didn't want to ruin the t-shirt! Technically you should be wearing the t-shirt and a friend should do the rest for you. Thankfully, I had my Shell (lol) that I could use as a body double!

Step 2: Get 2 pieces of calico (one for the front and one for the back) and pin down the centre line. Then you need to gradually smooth the fabric to your body, pinching out the fullness above and bellow the waist and above the bust.

You do this for the front and the back, being careful not to stretch the t-shirt.

Step3: Next you cut out the arm and neck holes following the seam of the t-shirt. Then pin the front and back together at the shoulders and down the sides, again getting as close to the body as you can without stretching the t-shirt.
Front view

Back view
Step 4: Draw along all the pin lines and then remove the pins. 
Label the four sections; centre back, side back, centre front and side front.

Step 5: Cut along all the pin lines to reveal four pattern like shapes.

Sorry, I guess I forgot to rotate this one!
Step 6: Fold a piece of calico selvedge to selvedge and lay your block pieces on it (the centre front should be next to the fold). Taking one piece at a time; pin it to the fabric, draw around it and then draw a 1.5cm seam allowance. Allow a 3cm seam allowance for the straight edge of the centre back.

Remember to label the pieces!
Step 7: Cut around the seam lines.


Step 8: Stitch the pieces together (leaving the centre back open!), snip into the seams on the curved edges and press the seams open.

Then try it on!
Step 9: Pin along the seam line at the back and check the fit, pinching out any fullness much the same as you did before.
As you can see the back of mine was quite baggy
round the shoulder blade area. 
At this point I have some good news and bad news! The good news is I seem to have lost a few inches around my chest, waist and hips - Yay! The bad news is, because of this Shell is now slightly bigger than me. And so, at this point I needed to try the block on myself, luckily I had Danny around to pin me up!

As you can see I had to pinch out fullness above the bust.
And also some more across my shoulders.
Luckily the block was pretty tight on Shell round the waist and hips, so fitted me perfectly :D

Well, that's as far as I have got. Next I need to make the adjustments to the block and try it on again to make sure it fits perfectly. Then I can use the block pieces to make a pattern for my new dress! :D

I hope this all made sense! x

Saturday, 27 August 2011

T-shirt re-vamp!

Just over seven years ago I was on holiday in Hong Kong. Whilst engaging in a little retail therapy a rather flashy belt caught my eye.
I realise now I should probably have taken a photo of said belt so you could get a picture in your mind as to what I'm talking about... maybe I'll do an update in the future...
The buckle is about 3 inches in diameter and is full of diamante crystals... You can guess how it caught my eye! Needless to say, the belt has been my favourite waist accessory ever since.

This may sound like a rather happy story! But just like as the old yogurt advert explained, you can't have pleasure without the pain... in this case it is the fact that my beautiful belt likes to create holes in my t-shirts :(

OK... I know its not a huge problem, but sometimes you get a t-shirt that you really love and you know you'll never be able to replace and then it becomes a bit annoying!

Well I decided it was time to do something about it. Out came the needle, thread and my sewing book and I got to darning all those pesky little holes!
Incidentally, should anyone be interested buying a book on sewing techniques, for an absolute beginner (like me) The Sewing Book is IMHO a better option. The step-by-step photos are larger and there are a number of projects at the back of the book to get you started!
Unfortunately, some of my thinner t's had suffered pretty badly and the holes were just to darned big to darn!
Did you like my word play, you did didn't you! ;)
And so, out came the leftover fabric from Wiyots curtains and the embroidery thread I used to make friendship bracelets with in high school!
I knew they would come in handy one day!
I added an applique butterfly (to cover the holes) with french knot details on the wings, some lazy daisy flowers (I think thats what they're called?) and some viney type things! :)

Please ignore the vacuum... I know I do! ;)
I know its not perfect, but I was quite pleased with it, especially for a first attempt! And yes it would look better not so central, but as you can imagine that's where the belt buckle creates the holes!

What do you think?

I should also have taken a photo of the inside so you could see the holes... Ah well!

And just cos I'm loving playing with my hair at the moment, here's my style of the day!

All about the flicks! :D
As I was writing this post, Shoshone wanted me to get Buzz Lightyear from the toy box for her. This is how he emerged:

"Ole!"
Does anyone else suspect he maybe in Spanish mode? ;)

Tuesday, 12 July 2011

It's all about the superhero's!


Last week my little man turned 5! 

EEEK! Where did the time go???

Over the last few years Wiyot has developed various favourite characters, first one being Wall.E, most of them being some form of superhero: Buzz Lightyear, Spiderman, Iron Man, etc... Last year the hero of the moment was Disney/Pixar's Mr Incredible.

In June, 2010 he received an invitation to a Superhero birthday party, it was no surprise who he wanted to go as! However, it was a surprise that there were very few Mr Inc costumes available to buy. Lucky for me/Wiyot my new sewing hobby had just begun.

So we "Dash"ed ;) off to the local(ish) fabric store and purchased some suitable material... thats right red and black lycra! Oh yeah!

First step was to draft a pattern using some cheap muslin fabric. I did this by following the directions in The Little Black Dress... Wiyot wasn't too impressed by this process! Hence there are no photos!

Once the pattern was finished, the fun truly began!

Wiyot was very impressed even at this stage...
Here he is reenacting the scene where Mr Inc
stretches and shows his belly :)
As soon as the fittings were in the red fabric, Wiyot was much more excited and didn't want to take off the pieces.

Two days later...
Please excuse the mess in these pics, this is what happens when you have only a week to make two superhero costumes... from scratch!

Show time!
I also knocked up a Jack-Jack costume for Shoshone, throughout the night! :/ Unfortunately, didn't really get any good shots of that one, but it actually turned out better than this one... Probably because I had gained experience working with the fabric.

Well, the costume was a big hit. People at the party even asked me were I bought it from :D

Wiyot wore it pretty much every day for the next few months and its still going strong... bit tight now though :/

And finally, what other card could he have had other than an Incredible one (for his 4th birthday)...


As always, a last minute job... I feel like a terrible mom admitting this, but I actually got up early and made it on the morning of his birthday (Sorry Wiyot!)

The latest craze is Spiderman... 

He's already put in an order for a new suit... 

Any ideas how to do the web patterns???

Monday, 6 June 2011

And so it begins XD

My book arrived on Saturday!

But not before I'd already whipped up a few sketches...

First proper sketches for years... felt a bit rusty :/
These designs aren't exactly by me... They're based on dresses I've seen in magazines and on the net over the years, my favourite being the one on the top left based on a dress worn by Scarlett Johansson. If you've been paying attention to my last few posts, you may have noticed that the middle one is a kind of short version of my wedding dress :D Which leads me onto the next sketch...

<3 my favourite so far <3

Again, if you read the previous post, the above dress may look a little familiar. Its kind of a new version of the bridesmaid dress design. As I mentioned before, I wasn't entirely happy with the way the outfits turned out...

So, what better opportunity to put it right! 

This time I've gone for a kind of pencil skirt rather than the A line look. Also I've included a little cap sleeve (hoping they'll help balance out my generous derriere!) and possibly a kind of kick pleat in the back.

I'm really happy with this design... Think its going to be the one I make! Arrrgh! (Excited scream)

Now I'm thinking about the type of fabric, what colour it should be, the construction methods... 

And SHOES!! :D

Kind of scared too, its going to be much more difficult than anything else I've made. I've never done many of the techniques I'll probably have to use. Also the fabric will most likely be very different to the ones I'm used to... 

I say that as though I'm an experienced stitcher! lol 

Most of the time I just turn up peoples jeans! Hahaha

Friday, 3 June 2011

Continuing on from before...


When I was a kid, before I qualified as a Clinical Aromatherapist, before I wanted to become a Physiotherapist, there was a significant period of time when I wanted to be a fashion designer... I'm not talking Americas next top model type fashion... More the everyday, stuff you could actually wear type stuff! 

That of course was before the career advisor at school told me that I'd never make it and should do something else... Thanks!

When we started planning for the wedding, I soon faced a conundrum of what the "best woman" and the "flower girl" could wear. The problem being that their was a significant style difference between the two girls. Bonnie was only 11 and very feminine, I'm guessing she would have loved to dress up like a princess; On the other hand, I had never seen Eva in anything more feminine than female jeans, let alone a pretty dress! I guess being the bride I could have tried to get them to wear whatever I wanted, but I really wanted them to be comfortable. So I set about designing a suit and dress that would complement each other.

For some reason I quite liked the idea of a east/west fusion :) 

... think I was also inspired by some of the costumes in Lord of the Rings?

But anyway, I designed an A line dress with a mandarin collar and wrap front detail

Bonnie the Flower Girl

and a trouser suit, again with a mandarin collar and a wrap around closure, also with a kind of flared sleeve.

Eva the Best Woman
They were made by Marilyn Hall and turned out pretty well. I was happier with the dress than the suit, I guess I shouldn't pick flies in someone else's work... but I wasn't happy with the sleeves. She did the flare different than I had pictured and for me it just looked a little weird...  

But hey ho, guess thats what happens when you don't make it yourself!

There were other bits that I designed and made for the wedding, but not really worthy of a blog!

The End :D

Incidentally, I also designed myself a wedding dress. It was actually quite similar to the one I wore, a mermaid gown, but with a mandarin collar and wrap front... 

Tuesday, 31 May 2011

The Party Dress

I know its only May, but at work we've already been planning for the festive season! The Christmas Party has been booked and I've had to decide whether or not to go!

OK this may not seem a big deal to you, but for me it is. Mainly because if I do go, I will go a whole day without seeing my kids. :'(

But, they are getting older now and I'm sure they/I will survive the time apart...

And so, I have decided to go :D

Yesterday I let the folks at work know. The instant the little message appeared saying the text had been sent, a new issue hit me... 


"WHAT AM I GOING TO WEAR?!?!?!"


This question also sparked something else in me...

A desire I've been suppressing for too many years to mention...

An opportunity too good to miss!


"FASHION A FABULOUS FROCK*!!"

And so I have ordered a book The Party Dress by Simon Henry. I've had my eye on it for a while, so this is a perfect excuse :D

I already have a few designs in mind... watch this space! ;)

* Incidentally I hate the word frock... sounds so old fashioned and boring, I was just going for some alliteration!

Friday, 19 November 2010

Day 2 Dolly

So after my practice run with Eve the Sarubobo plush, I decided I wanted to do a more challenging dolly to give to my nan. 

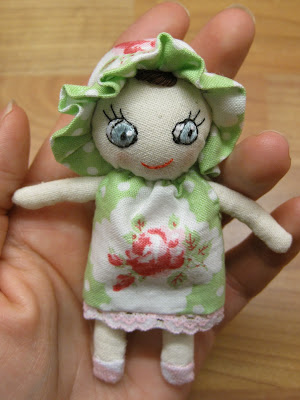
Having perused Mochi's blog the day before, I was quite inspired to attempt one of the other little dolly type characters that she made. Luckily she mentioned that the doll was a bunka doll, giving me something to search for when looking for a pattern. Patterns were pretty hard to locate, but eventually I found this one... it's in Japanese, but the pictures were clear enough for me to figure it out.

Result...

Named Eva by Wiyot 
The dress and hat were made with bits left over from an apron I made my nan last year using fabric by Tanya Whelan. The shoes were from an old bed sheet my mom gave me to practice with, and the rest was scraps of muslin.

Off for a ride
This doll and the Sarubobo were pretty small, easily made with fabric scraps.... Finally something to do with all those bits I've been holding onto!

Thursday, 18 November 2010

I should really be in bed right now!!

It's 4:45 am and I'm up doing a blog.... Oh dear :/

Well I just really wanted to share my latest creation.

I'm naming her Eve... well because she's my first one! :)
 It's my nan's birthday on Friday and generally my grandparents prefer it if we don't buy them anything. I hate not giving them anything though, so for the last couple of years I've tried to make things when I can. A mini scrapbook, an apron, etc...

This year the plan was to either do some form of embroidery and put it in a frame that she could then use for a photo, or to make one of these bowls/boxes. I found the link some time last year when someone from the sewing forum shared it. However, only when I came back to find the link did I look at the other projects on the blog... I was there for quite some time looking at all the cute little things my little mochi has made! I particularly liked this little one and decided that this might be a nice little gift for my nan.

Lucky for me, this post had a link to a great tutorial by mairuru.

As you can see the tutorial worked perfectly, so simple to make and fairly quick! After I'd finished the Sarubobo tutorial, I figured I may as well try and add a little face...

I don't know about anyone else, but I think she's cute!
Having not embroidered anything like this before, I'm pretty pleased with the result! It's not perfect but is only a practice run. As you can see I then got a little carried away, crocheting her a little scarf and attmpting to make little hands (one's a little bigger than the other, but who's measuring! lol)

Well, better be off to bed. Tomorrow I'm making the real one... as in the one for my nan :)

Tuesday, 30 March 2010

2 rolls of duct tape, cling film and a half naked lady...

I'm guessing that everyone that attempts making their own clothes, soon realises a dressform would really come in handy. However, as a newbie, I'm not sure I want to fork out for a pretty expensive piece of equipment that I may or may not use. Plus it most definitely won't be the exact measurements I need it to be... I can rarely find clothes to find my shape, what're the chances of finding a dressform?

Well as soon as I got interested in sewing I subscribed to a magazine called "Sew." Coincidentally, it came out at exactly the same time as my (renewed) interest and was aimed at beginners... perfect! Anyway, think it was maybe the forth issue? there was an article by a dressmaker who recommended making your own dressform out of an old t-shirt and some duct tape!

Cool, looked like a good idea! But then I forgot about it...

A few months later I was looking at the sewing forum and again came across the idea of a duct tape dressform, except this time using cling film and with more detailed instructions from someone who had tried it.

Again cool, but again I forgot about it... but not for long!

Think it was a few weeks later I was reading another blog and again the diy dressform was mentioned. Well I can take a hint you know, so I sent Danny off to the DIY to get some duct tape (I also called my parents to get them to save their old newspapers...)

The weekend just gone we finally got around to taping me up, lol!

I striped down to me undies and Danny wrapped me up in cling film. Easy! Although I probably shouldn't have stuffed myself silly on pasta before starting... Belly was a little rounder than normal... What can I say, I love carbonara :-9

Once cling wrapped, we began the lengthy process of taping me up! I knew it was going to take a while, but somehow I convinced myself that Danny and I would be naturals and be able to get it done super fast! I was wrong... well I think... I don't actually know how long it takes anyone else, so for all I know maybe we were pretty quick! It took us around 3 hours, plus extra time for coffee and cake :-)

Not too bad I guess, except we didn't start till gone midnight...

We did 3 layers in all, I've since seen recommendations for 6-7 layers, would definitely make the finished shell more sturdy, but there was no way I could have stood around for all that time. Once the cling film was on I didn't want to move as it came off so easy, then when the first layer of tape was on I couldn't move even if I wanted to... I could do a pretty good robot walk and hold the tape for Danny, but that was about it. As you can probably imagine, 3 hours of hardly moving = a very achy Michelle!

For anyone that's interested we did 3 layers first taping horizontally, next vertical and finishing with another horizontal layer. The different directions help to stabilise the tape. We used 1 and a bit rolls of B&Q multipurpose gaffer tape (50mm x 50m), the kind with the threads running through it to help stop any stretching and distortion. The tape was cut at varying lengths depending on the area being taped, longer pieces for the larger curves and flatter areas (thighs, stomach, back, etc) and much smaller ones for tighter curves (shoulders, neck, waist, etc). The breast area is very tricky, we tried to do a kind of cross your heart thing, but it didn't work at all. So we cut it down the length to make short narrow strips, the key is to not stretch the tape as you put it on else you flatten out the bust, rather than getting the true breast shape. Incidentally, for the torso I tried to always inflate my chest when I was being taped, didn't want Danny to have to cut me out too soon due to me not being able to breathe!

So here's how it looked before we cut me out :-)


Pretty good I think, quite tempting to sew a zip up the back and wear it as a dress, although I'd probably have trouble sitting down and would definitely want it longer :-S

I decided to make some kind of tube to fit inside that I can fit over my Hangaway (when not in use!) Here is my hangaway cover... (yes I confess, I shop at QVC!)


 And here is my completed dressform!


Not bad I think :-) Filling it was pretty tricky. I used old newspaper (thanks Mom & Dad!) and stuffed through the various available orifices... thankfully I hadn't sealed them up as I had planned to! The tube in the middle helped it to keep its shape, rather than going a rounded shape. I also added some card board at the shoulder to support the shape as well as pieces above and below the breasts and a piece on the back. If you're wondering how much newspaper, I used 4... 1 for the torso and 3 for the bum! lol! Oh and I also put a hanger in the top so that I can hang it if I need to and also to again support the shoulders when its got whatever fabrics hanging on it.

So that's about it, I've decided to leave the holes open for the time being. Ready for further filling should the need arise, although I have put a few pieces of tape over the base to stop the paper falling out!

Sunday, 14 February 2010

A Dress for Shoshone

I have so many projects, both completed and on the go, its hard to choose one to start the whole process off...

This one seems quite a good one though as I'm pretty pleased with how it turned out :-)

So Shoshone's first birthday was coming up and I realised that she didn't have a special dress to wear for her party... The plan was to nip out to a local outlet to find her a nice little outfit, somehow this changed to designing and making her a dress from some left over fabric.

Doesn't sound too bad, except it was Wednesday afternoon and the party was to be on Saturday. Not to mention that I've never drawn up my own pattern before, or made a dress, let alone done button holes (manually) and only started teaching myself to sew late 2009.

But I'd made up my mind. I made a sketch of what I wanted, studied some of her existing dresses and got to work making a toile. The design changed a few times in the making process, but ended up pretty much how I envisioned it in the first place.

Everything went pretty smoothly...


...until I got to the button holes, I almost ruined the dress!


I could do them fine on the practice fabric, but could I do it on the real thing? NO!

Thankfully I figured out what was causing the problem before it was too late. A seam in the dress was causing the presser foot on the sewing machine to move the fabric slightly to the side, causing the stitches to be too close together so I couldn't cut open the button hole... Not sure that makes sense, but don't really know how else to explain it!?!
Anyway...


The finished result, not too bad I think... Well I'm pleased with it anyway :-)

And a rather reluctant model...
Needs a bit of an iron, but you get the idea :-S
The best thing is it was free!! Made from left over dress fabric, an old bed sheet and some scraps from an apron I made my nan :-)