Thursday, 15 September 2011

The progress so far

I've finally got around to drafting my skirt pattern and have also cut out the skirt pieces... Still need to do the waist band, but that shouldn't take too long!

I was really surprised how large the pattern turned out! If it was any bigger I think I would need a bigger house! lol

For my skirt I have decided to go for a longer length, falling around mid-calf. Hopefully it will be flattering, if not I might shorten it a little... But for now the length is 30inches.

To draft my pattern I had to stick 14 sheets of A3 paper together!! As I was doing this during the day I constructed it on our bed. As you can see from the pictures below, it took up practically the whole bed!

Just starting to draw out the pattern

The finished pattern all cut out
After seeing how large the pattern was I knew there was no way I would be able to carry on till the kids were in bed and I could lay the fabric out in the living room. This is the bit were I almost needed a bigger house. I had to move some furniture out to be able to lay out the fabric and I only just had enough room!

In the bottom right corner you can see the wall were the
fabric started and it stretched to just under the sofa!
I followed the layout suggestion provided by Tanya which you can view here. I also used this link and the equation to calculate the amount of fabric I would require (3 metres). On a side note, I guess I can no longer say that I've not used my maths since leaving school! ;)

One of the main things I've been stressing over since buying my lovely checked/plaid fabric, is matching the pattern at the seams. This is something that I have never done before and to be honest looks pretty complicated! Also if you get it wrong it makes the finished garment look very amateur. Lucky for me, the fabric I have chosen has even checks (i.e. they are symmetrical), if they were uneven I think this process may have been more tricky? In The Complete Book of Sewing, it suggests you mark the fabric bars (stripes) onto the pattern paper with a pencil or crayon.

Doh!


I marked the bars along the edge of the paper for about 30cm before realising it was really the pattern along the straight edge that I needed to match! *face palm*

The seam will be along the straight edge, therefore this is where you need
pattern match!


As I was working on the laying of the pattern pieces and matching the pattern, it occurred to me that I could also match the vertical bars to create a seamless finish. Luckily for me the pattern is perfectly proportioned for this. The thickest bar (the one at the middle of the repeating pattern) is exactly 3cm wide. I am using a 1.5cm seam allowance, so in theory if I cut along the edge of this bar the sewing line will be perfectly in the middle... Theoretically anyway!! :/

To give you an idea of what I am jabbering on about!

Finally all lined up and ready to cut.


I can't tell you how many times I checked (lol) everything before cutting! I get so paranoid I am going to do something wrong and ruin all that beautiful fabric! I still don't know for sure I've done it right. Wont know for definite until I get to the sewing :/

For the second skirt piece I was finding it tricky to get the pattern of the fabric to match up whilst keeping the straight edge of the paper on the edge of the stripe. I think this was due to my paper being not completely square and flat due to the sticky tape. Also the lack of room was creating difficulty, it was hard moving around the fabric without stepping on it and pulling it off grain. In the end I decided to lay the cut fabric on top and use that as my pattern piece. I pinned the pieces together all the way around the permitter, matching the pattern as I went. Doing it this way (I hope) will have worked perfectly. I forgot to take a picture of this, but I hope you get the idea!?

Here's an idea of what the two pieces should look like when sewn together!

How tiny does the waist hole look!!!


Well, that's as far as I have got for now. I think the next step in the sew along is to join the side seams... That will be the moment of truth for the pattern matching! Eeek!

Thanks for reading, hope my ramblings made sense!

xx

Wednesday, 14 September 2011

Crispy Roast Pork Belly! :9

Sorry, haven't posted here for a while... I've been meaning to but have been busy with my home education blog. Wiyot has suddenly developed a thirst for knowledge and has been keeping me very busy! :D

Anyway, back to my belly... Pork belly that is! Although I guess it was for my belly :D 

Last week, while searching for something or other, I stumbled upon some food blogs. If you would like to check them out, have a look here and here!

I'll admit, I spent a rather long time drooling over the various recipes. There are many that I am going to attempt, but this was the debut! If you would like to have a go yourself (I highly recommend it!) you can find the recipe here!

BTW the colours are a little off on these pics, hopefully you get the idea though!

Marinating

The skin cleaned and salted. 
Unfortunately the only joint available was scored on the skin side, which didn't help with the crisping process. :(

After cooking I put it under the grill to help crisp it up.

Chopped into rather large bite sized chunks.

Mmmm so juicy! :9
Verdict: Very pleased with the outcome. The meat was beautifully tender and very moist. It was also very tasty, but next time I will definitely marinate it for longer! I will also be paying the butchers a visit next time, so hopefully the skin will be intact!

Oops, just realised technically this would be the second Chinese recipe I tried... I also made steamed buns with Wiyot on the same day!

Click on the pic to see the full post!
Will be posting news on the circle skirt very soon :D

Wednesday, 7 September 2011

Pony Post

A rather unusual package!
I guess I'm a little late blogging about this 'post' ;)

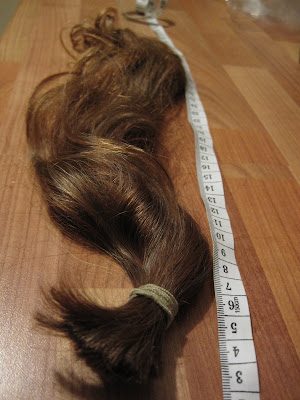
As you can see, my hacked off hair has now been shipped off to meet its fate... Hopefully to become a wig, which will bring a smile to a child's face :')

But if not, at least we managed to raise some money for a very worthy cause!

Thank you again to everyone who has supported me! xx

Tuesday, 6 September 2011

Circle Skirt Teaser


For as long as I can remember I have had a fondness for 1950's fashion, specifically the circle skirt, or poodle skirts as I called them before I knew any better! I don't know where it came from, but all those times watching Back to the Future, Peggy Sue Got Married and Grease probably had something to do with it! I vividly remember being 11 years old and standing in Florida's Old Town, gazing at the beautiful clothes in a vintage fashion store... *sigh*

Well, a couple of weeks ago, Casey over at Elegant Musings decided the time had come to do a circle skirt sew along. And well, who could pass up an opportunity like that? I for one cannot!


And so I am currently taking part in my very first sew-along! *claps hands excitedly*

Unfortunately Casey has been suffering a few technical issues recently, so its all getting a little delayed. But the other day I got my supplies ordered and am rather excited so I thought I'd share them with you!


I really love the way checked or plaid fabrics look when made into a circle skirt, so I knew this was what I wanted to go for. I also fell in love with an image on Casey's Inspiration post, a plain black skirt with a red lining. And so...


My petticoat is going to be in these vibrant reds. I'm hoping that you'll get a cheeky glimpse of them every now and then when I'm walking, sitting, etc. :D
Well that's all I have to share for now! 

xx

Thursday, 1 September 2011

The Body Block

Ok, just incase anyone stumbles upon this via Google or something, this is a body block of the non-martial art variety!

For those of you that don't know what a (non-martial art) body block is, it is basically a fabric copy of your exact body shape. This can then be used to create pattern pieces for your own clothing designs... It also means that the subsequent designs should fit you like a glove! Well that's the theory anyway!

I have been planning to make one for quite some time now, unfortunately I never seem to get round to it. But last week Danny and I were both off work and for a change didn't have any concrete plans as to how to spend our time... And so out came the muslin, my good friend Shell (get it? My Shell! I am a comedy GENIUS!) and my trusty sewing machine!

By the way, I should probably mention I made this block by following the detailed instructions in The Little Black Dress by Simon Henry. I am still to make my 'Little Black Dress' but can thoroughly recommend this book to beginner sewers and possibly even more experienced ones. It covers all the  techniques needed to stitch your own LBD, information on fabric choices, body shapes, how to manipulate your body body block to make 3 different dresses and a bolero... And also instructions to make a fascinator! I actually own all three of his books, but I think this one is still my favourite!

But anyway, back to the body block! I'm not going to go into all the details as this would be a VEEERY long post, I just wanted to give you an idea of the process. If you want to have a go you could get the book from the library, or I'm sure there are tutorials out in cyberspace somewhere!

Step 1: Get yourself a t-shirt that fits you really well and draw a line down the middle (front and back)

Shell wearing my Inc. t-shirt
I used chalk to mark my line as I didn't want to ruin the t-shirt! Technically you should be wearing the t-shirt and a friend should do the rest for you. Thankfully, I had my Shell (lol) that I could use as a body double!

Step 2: Get 2 pieces of calico (one for the front and one for the back) and pin down the centre line. Then you need to gradually smooth the fabric to your body, pinching out the fullness above and bellow the waist and above the bust.

You do this for the front and the back, being careful not to stretch the t-shirt.

Step3: Next you cut out the arm and neck holes following the seam of the t-shirt. Then pin the front and back together at the shoulders and down the sides, again getting as close to the body as you can without stretching the t-shirt.
Front view

Back view
Step 4: Draw along all the pin lines and then remove the pins. 
Label the four sections; centre back, side back, centre front and side front.

Step 5: Cut along all the pin lines to reveal four pattern like shapes.

Sorry, I guess I forgot to rotate this one!
Step 6: Fold a piece of calico selvedge to selvedge and lay your block pieces on it (the centre front should be next to the fold). Taking one piece at a time; pin it to the fabric, draw around it and then draw a 1.5cm seam allowance. Allow a 3cm seam allowance for the straight edge of the centre back.

Remember to label the pieces!
Step 7: Cut around the seam lines.


Step 8: Stitch the pieces together (leaving the centre back open!), snip into the seams on the curved edges and press the seams open.

Then try it on!
Step 9: Pin along the seam line at the back and check the fit, pinching out any fullness much the same as you did before.
As you can see the back of mine was quite baggy
round the shoulder blade area. 
At this point I have some good news and bad news! The good news is I seem to have lost a few inches around my chest, waist and hips - Yay! The bad news is, because of this Shell is now slightly bigger than me. And so, at this point I needed to try the block on myself, luckily I had Danny around to pin me up!

As you can see I had to pinch out fullness above the bust.
And also some more across my shoulders.
Luckily the block was pretty tight on Shell round the waist and hips, so fitted me perfectly :D

Well, that's as far as I have got. Next I need to make the adjustments to the block and try it on again to make sure it fits perfectly. Then I can use the block pieces to make a pattern for my new dress! :D

I hope this all made sense! x

Tuesday, 30 August 2011

More of the same...

Well I know at least one of you (Courtney!) is looking forward to reading/seeing this post! ;)

As you can probably imagine, I have done very little with my hair over the last 6 years! So I guess its not that surprising that I am now going a little hair mad!

With that in mind, as well as the fact that I have a rather large fondness for all things red, the below pictures shouldn't be too much of a surprise!

With my new red lippy and a flower :)

I used a different eyeshadow shade than normal.
Quite like it with the red hair


What do you think? I wasn't sure at first, it didn't come out how I had hoped... Don't get me wrong, I didn't hate it, but I didn't love it either. However, two sleeps later, it is definitely growing on me! :D

PS I was going to take a pic of the back, but this is literally my bed hair (its amazing what a great haircut can do!) and it didn't look quite so stylish from the back!

Thanks for reading! x

Monday, 29 August 2011

Macaroni Monday :9

Mmmmm! Macaroni! :9

Sadly this is not on tonights menu, but is a meal I made and photographed some time ago... Sadly I haven't been able to indulge for a couple of weeks as my stomach has been a little particular! I don't really want to go into all the grisly details, lets just say I've not been eating properly!

But anyway... back to the macaroni!

I like a number of different Macaroni cheese recipes, but I've been making this baked version for a looooong time... I can't even remember where the recipe came from! It may possibly have been my high school cook book from home economics class! :O I'm not sure if this is the same though, I think it may have been modified over the years! lol

Ingredients:
  • 50g butter (real butter works best, but you can use margarine too)
  • 50g plain flour
  • 500ml full fat milk (you can use skimmed, etc. but the flavour wont be as rich!)
  • 200g macaroni (to be honest, I use whatever shaped pasta I have in the house)
  • 250g grated cheddar cheese (the stronger the better!)
  • pinch salt and pepper
  • 1 rounded teaspoon of mustard (you can use any kind, I like english mustard or wholegrain as the seeds look really nice in the sauce)
Method:
  1. Bring some salted water to the boil and add the pasta (follow instructions on pack to cook your pasta till al dente and drain) 
  2. pre-heat the oven to 180ºC
  3. Melt the butter in a large saucepan over a low heat
  4. Add the flour and cook for a minute, stirring all the time
  5. Gradually stir in the milk, a little at a time else it will get lumpy!
  6. Turn up to a medium heat and bring the milk mixture thickens and begins to  boil. You need to keep stirring all the time else the sauce will go lumpy at the bottom of the pan.
  7. Allow to boil over a low heat for a couple of minutes then add two thirds of the cheese, the mustard and salt and pepper to taste.
  8. Mix the pasta to the sauce and pour into a suitable oven dish
  9. Sprinkle over the remaining grated cheese (a couple of handfuls of breadcrumbs is nice too)
  10. Bake in the oven until cheese turns golden and bubbly (I think its about 30mins?)
  11. Alternatively, brown the cheese under a grill... make sure it doesn't burn!
  12. ENJOY!
And here's one I made earlier!

A portion on a plate...

I never know what to serve with Mac n cheese... On this occasion
I went for beans and onion rings!
Do you have a favourite mac n cheese recipe? What do you like to serve it with?

Thanks for reading! x

Saturday, 27 August 2011

T-shirt re-vamp!

Just over seven years ago I was on holiday in Hong Kong. Whilst engaging in a little retail therapy a rather flashy belt caught my eye.
I realise now I should probably have taken a photo of said belt so you could get a picture in your mind as to what I'm talking about... maybe I'll do an update in the future...
The buckle is about 3 inches in diameter and is full of diamante crystals... You can guess how it caught my eye! Needless to say, the belt has been my favourite waist accessory ever since.

This may sound like a rather happy story! But just like as the old yogurt advert explained, you can't have pleasure without the pain... in this case it is the fact that my beautiful belt likes to create holes in my t-shirts :(

OK... I know its not a huge problem, but sometimes you get a t-shirt that you really love and you know you'll never be able to replace and then it becomes a bit annoying!

Well I decided it was time to do something about it. Out came the needle, thread and my sewing book and I got to darning all those pesky little holes!
Incidentally, should anyone be interested buying a book on sewing techniques, for an absolute beginner (like me) The Sewing Book is IMHO a better option. The step-by-step photos are larger and there are a number of projects at the back of the book to get you started!
Unfortunately, some of my thinner t's had suffered pretty badly and the holes were just to darned big to darn!
Did you like my word play, you did didn't you! ;)
And so, out came the leftover fabric from Wiyots curtains and the embroidery thread I used to make friendship bracelets with in high school!
I knew they would come in handy one day!
I added an applique butterfly (to cover the holes) with french knot details on the wings, some lazy daisy flowers (I think thats what they're called?) and some viney type things! :)

Please ignore the vacuum... I know I do! ;)
I know its not perfect, but I was quite pleased with it, especially for a first attempt! And yes it would look better not so central, but as you can imagine that's where the belt buckle creates the holes!

What do you think?

I should also have taken a photo of the inside so you could see the holes... Ah well!

And just cos I'm loving playing with my hair at the moment, here's my style of the day!

All about the flicks! :D
As I was writing this post, Shoshone wanted me to get Buzz Lightyear from the toy box for her. This is how he emerged:

"Ole!"
Does anyone else suspect he maybe in Spanish mode? ;)

Thursday, 25 August 2011

6 Years!!

Tuesday just gone was a special day for Danny and me. It was the 9th anniversary of when we got engaged and also our 6th wedding anniversary :D

I'm not sure what the traditional gifts you are supposed to give are, but for us we went off in the search of new shoe's! :D

Danny failed to find a pair he liked... and has somehow managed to turn shoes into an ipod nano! 

But never mind that... Here's my newest littlefoot decorations!


I know I didn't make them or anything, but I was so excited I couldn't wait to share them with you! :D

Wednesday, 24 August 2011

My Incredible Hair!

It was really difficult to decide what to blog about today... So many things that I want to share! But I thought I'd better start my potential blogathon with this...

I'm sure you all knew it was coming!! 

Thats right... It's the one about the hair!!! :D

As I'm sure you are all aware, I decided a while ago to chop my lengthy locks off and donate them to a the Little Princess Trust who make real hair wigs for children... If this is the first time you're reading my blog, you can check out my first post here!

When I did the original post I hadn't taken any pictures... but as the date for the chop approached, I finally managed to get a few snapshots. :)

My hair hanging down to my waist
Saturday 20th August was the day! On the morning I stood in the shower washing my hair for the last time and I began to feel very sentimental! As I looked at my hair I could see the last inch of the highlights I had for my wedding, just above that would have been the time I was pregnant with Wiyot and then Shone...

Yep, not your typical lathering session!!

Still, off we went to the salon... I had reached my fundraising target and there was no turning back! I have to admit, it was the most stressful trip to the salon I have ever had! Like going for a driving test or something, everyone waiting to see how I got on! lol

Ironically, the hair salon a few doors down was called Rapunzels! If I had known I may have gone there!

Danny came in with me to snap a few photos for evidence:

The lovely Rachel asking how much I want off :D

Not sure if she was nervous, but I had to convince her to go shorter!

Going...

Going...

Gone! :O

You can't tell on this pic, but the hair measures a whopping 46cms!
AND THE NEW STYLE....

Ta da!
I was really happy with it! It felt so soft and silky, and my head felt so light!

But then I went to bed... 

and as with all hairstyles, it mutated during the night!

It turned into...

Mrs Incredible hair!!! :O
OK, so it just flicked out on one side... But now I LOVE it even more! I literally could not wait to breakout the face paint and  the Incredibles t-shirt I made last year!

I may also have run round the house singing the Incredibles theme tune and striking Elastigirl poses... However, there is no evidence to support this! ;)


And for the first self style...

I like it curly too!
Just did a plain blow dry shaping it with my fingers. I really liked how it turned out... Kinda 1950's bob, which I am really rather pleased about! :D

In conclusion... I am LOVING my new do!

!!! PS if anyone still wants to make a donation to the Little Princess Trust, my JustGiving page will be up till 20th September!!!

xx